How to add a tap-to-change feature with Lens Studio

Letting someone tap to change the background or a post effect is pretty common in lenses. Lens Studio does not have this feature built in, but we can set it up pretty easily with visual scripting. And the best part is, the script is 100% reusable for other projects. You can preview an effect using this technique by clicking here or by scanning the snapcode below.

Scene setup
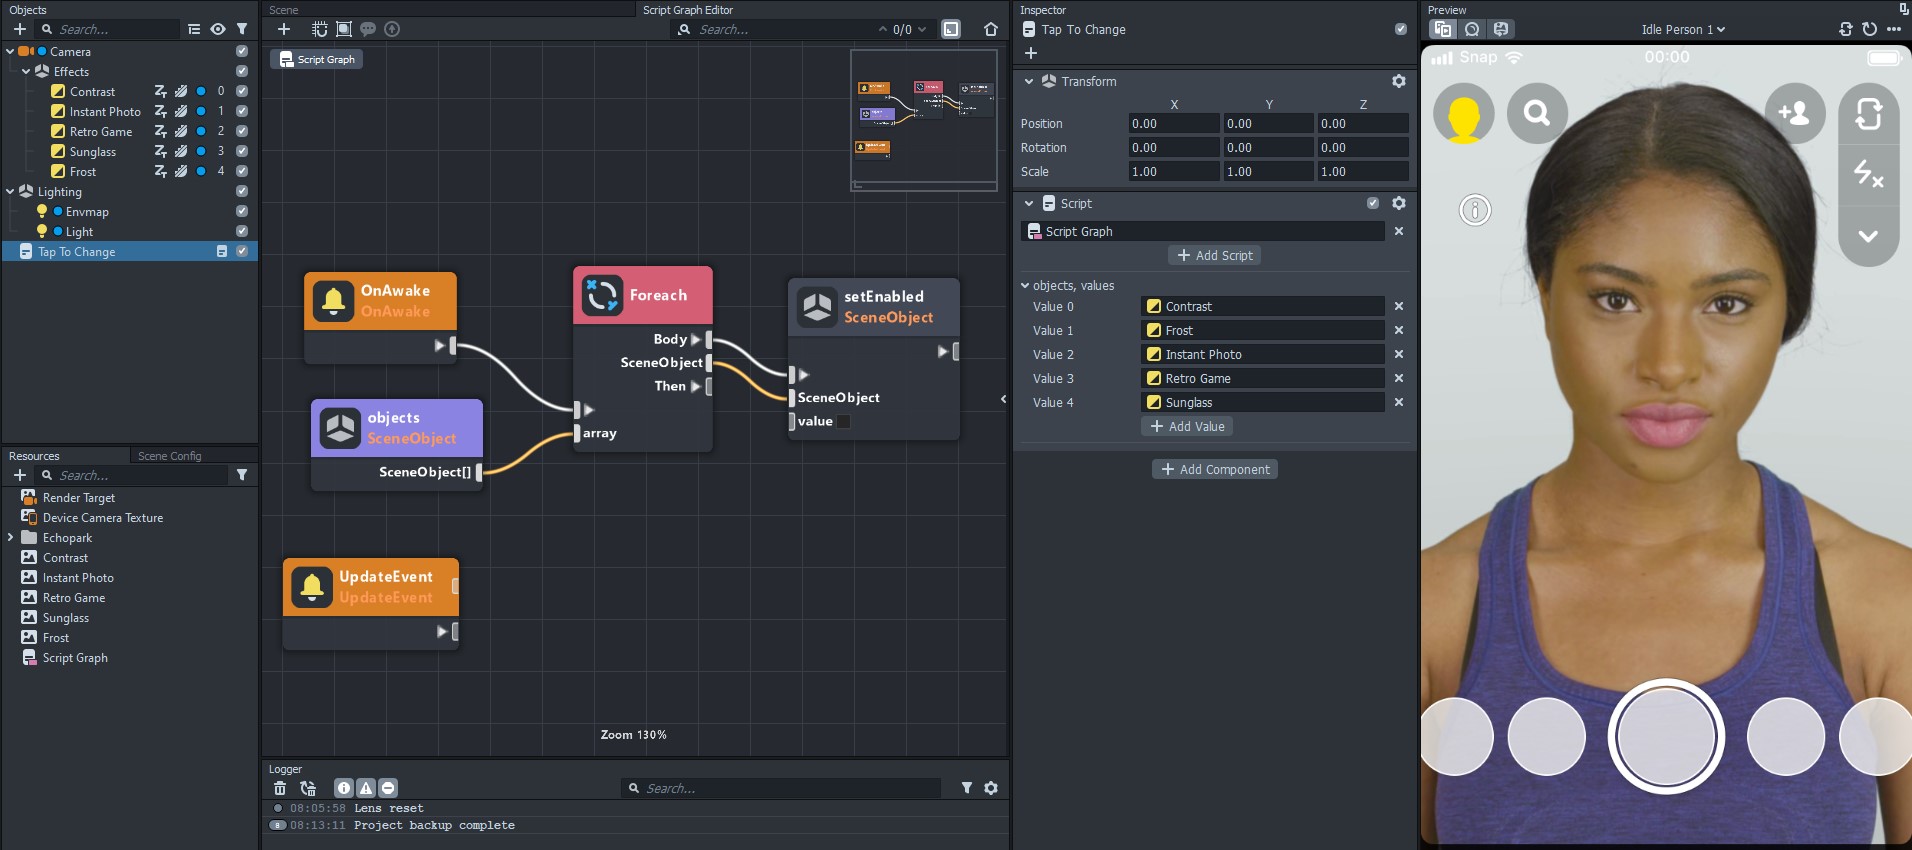
The scene setup is pretty simple. In the Objects Panel we just need to make sure we have several objects we want to cycle through. These can be post effects, color corrections, 3D objects, etc. Then in the Resources Panel, all we need to do is create a Script Graph and then open up the Graph Editor.
Starting with a clean slate
For our tap to change effect to function properly, we need to make sure all our various objects except for the first one start out disabled. We can do this manually by enabling/disabling items in the Objects Panel, but I like to do it within the script. Why? I like to do it in the script because then I can enable/disable objects at will while working on the lens inside Lens Studio, but then when it is running on my device it will always work. If I forget to disable one of the objects, it doesn't matter because the script will take care of that.
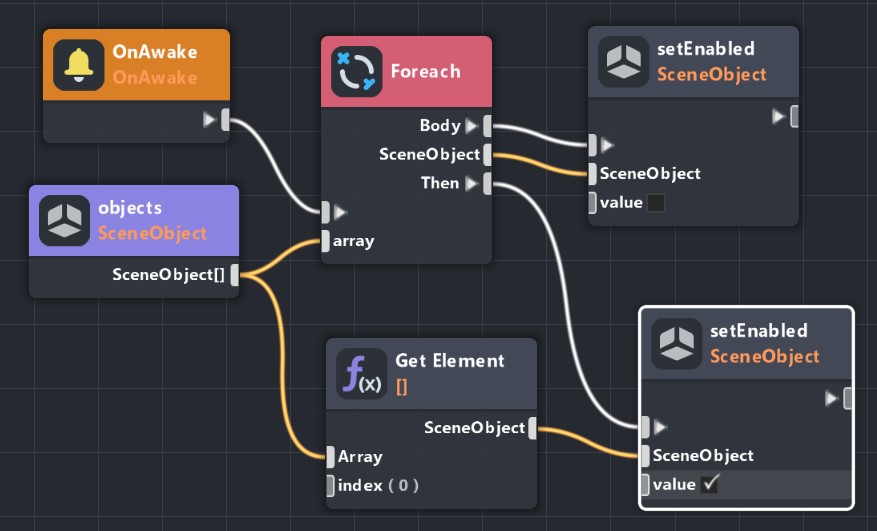
Let's start by adding a "SceneObject Array Input" and naming it "objects." You can add nodes by right-clicking in the graph editor and then searching for the node you want to add. The trickiest part might be knowing what to search for! An array is a list of data, in this case the various objects we want to cycle through. To cycle through our array of objects, we are going to use a "Foreach" node. While we're adding nodes, let's also add a "setEnabled" node (be sure to select the one for SceneObjects, there are multiple different setEnabled nodes).
Now that we have our nodes, let's connect them. Take the "OnAwake" node and plug it into the triangle input of the "Foreach" node. The triangle inputs/outputs signify different triggers; we want our lens turning on to trigger the loop. Then plug your "SceneObject Array Input" node (which will be displaying "objects" or whichever name you chose) to the "array" input of the Foreach. Then connect the "Body" output of the Foreach to the triangle input of the "setEnabled" and the "SceneObject" output to the "SceneObject" input. The "Body" trigger will trigger for each item in the array, and the "SceneObject" output is the current object in the list.
Now add your script to your scene. Add a "ScenObject" in the Objects Panel. Select the new object and add a script component in the Inspector panel and select the script graph. Click on the "+ Add Value" button and choose all the objects you want to cycle through. Now, even if all your objects are enabled in the Objects Panel, none of them will be visible in the Preview Panel.
Displaying the first item
You may notice that none of our effects/objects are visible after our loop. Let's go ahead and enable the first item in our list and then we'll create the loop.
First we need to add a "Get Element" node so that we can access specific items in our array of objects. Connect your list of objects to the "Array" input and leave the "index" at 0. Within Lens Studio (as well as most programming languages), we start counting through lists at 0. The first element is at index 0, the second at index 1, and so forth. It is a little confusing at first, but you'll get used to it with time. Now that we are accessing our first element, copy the setEnabled node. If you look at the Foreach node, you'll notice a "Then" output that we haven't touched yet. This trigger is fired once the loop finishes going through everything in the list. Let's connect that to the new setEnabled node, then connect the SceneObject from the Get Element node, and then check the box for "value." Now in the Preview Panel you'll see that the first item in our list is enabled.
Cycling through everything
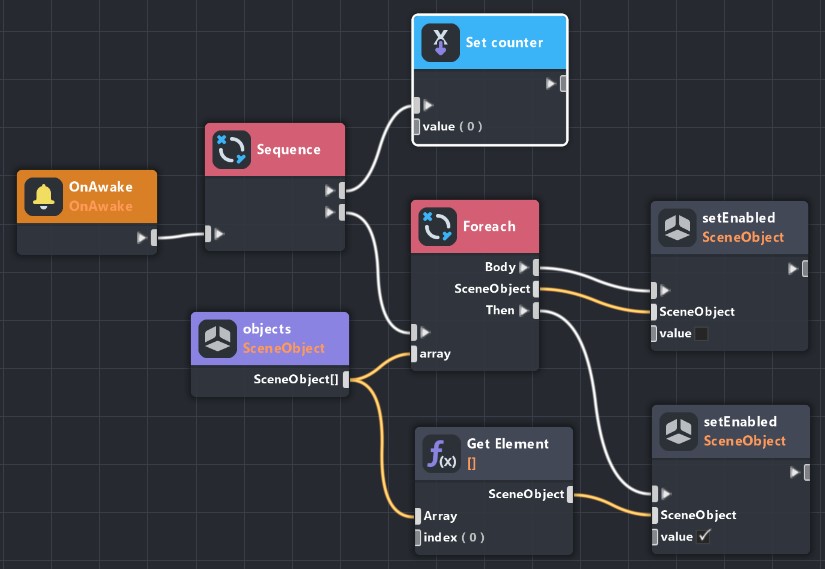
Alright, let's get to the good stuff. It is time to cycle through everything as the user taps. Go ahead and delete the "UpdateEvent" node and instead add a "TapEvent" node. As the user taps we want to disable the current object and enable the next object. To do this we'll need a way to keep track of where we are at in our list of objects. Over on the right-hand side of the Graph Editor there is a panel with an "Add Variable" button at the top. Click the button, change the name to "counter," and then change the type to "Number." We will use this variable to track where we are at in the list.
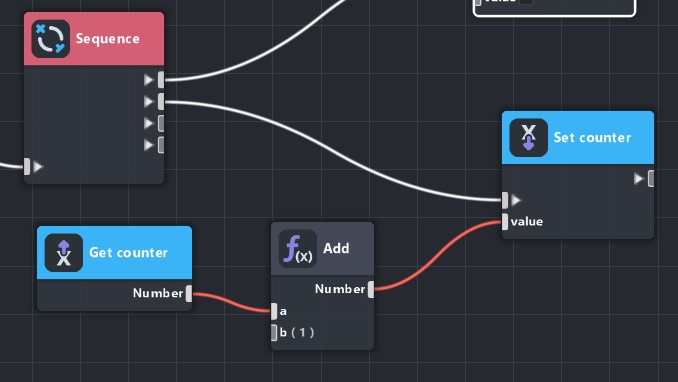
Now add a "Set Variable" node. This should default to our counter variable, but if not you can choose the variable you want to set over in that right-hand side panel. The starting value should be 0. You may notice that this node has that triangle input meaning that we need something to trigger this node. We want this to run when our lens turns on, but if you try connecting the OnAwake node, it will disconnect the Foreach. Instead, add a "Sequence" node and connect the OnAwake node to that. Then use one output of the sequence node to set our variable and the other to trigger the loop.
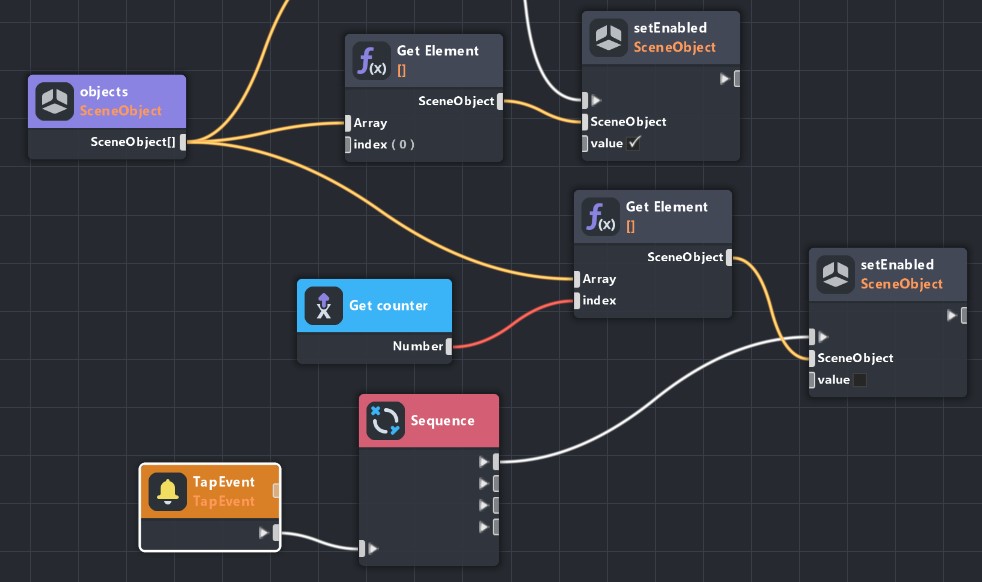
Are we ever going to actually cycle through our objects?? The good news is that yes, we are now finally ready to cycle through everything when the user taps. Let's head back to the TapEvent node and connect it to a new Sequence node. On the Sequence node you will want to change the count to 4. We need to disable the current object, increase our counter value, reset the counter if it goes too high, and then finally enable the next item in our array. It sounds like a lot, but we can do everything in steps.
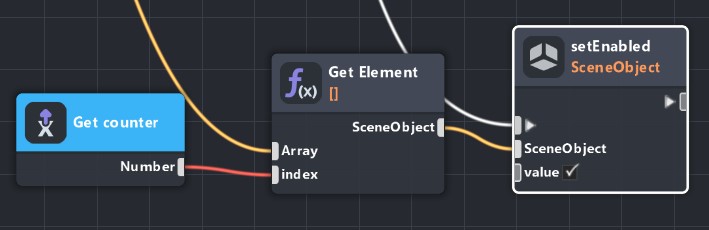
The first item of business will be to disable the currently enabled item. We will want a "Get Variable" node to get our counter value, a "Get Element" node, and a "setEnabled" node. Connect the objects array, Get Element, and setEnabled nodes the same way as we did so before, but instead of leaving the index at 0 on the Get Element node, plug in the Get counter node. Then connect the first output of the Sequence node to the trigger of the setEnabled (and make sure the checkbox on that is not checked to disable the object).
Our next step will be to increment our counter variable. We need a "Get Variable" node, an "Add" node (from the Math section), and a "Set Variable" node. Connect them as shown below (don't forget to change the second value of the Add node to 1).
As we move through our Sequence node outputs, you may notice our script graph getting a little messy and you may need to rearrange things. An alternative to using the Sequence node would be to use the output of the setEnabled node to trigger the Set counter node. This is a perfectly valid approach and might help keep the graph editor more tidy. I chose to go with the Sequence node because it is a convenient way to think about what we are doing and to go through step by step.
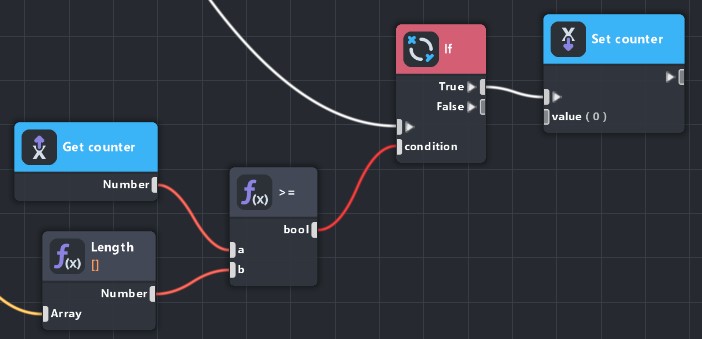
Our next step will be to reset our counter when it gets too high. Let's say we have 5 objects in our array. Our indices will be 0, 1, 2, 3, and 4. If we try to access index 5 of our array, we'll get an error in the script graph. When our counter reaches 5, we need to reset it to 0 to loop back through our array of objects.
We will need the get and set variable nodes, a "Length" node (from the Arrays section), an "If" node, and a ">=" node. We could just an "Equals" node, but I like a little extra safety so I'm using a greater-than-or-equals node (that's what the >= means). We will take our array length, see if our counter value is greater than or equal to it, and if true, we will set our counter to 0.
Our last step will be to use our fresh counter variable to enable the next item in the list. All we need to do is copy the same setup as for our first step, but instead of disabling the item, make sure that value box is checked to enable it.
Profit
The script is now all done! If you click on the Preview, you'll see your objects being cycled through and restarting when you get to the end. And the best part about all this? You never need to do it again! You can export the script graph and import it into other projects. A super win!
Pro tip: If you want to have a state where no effects/objects are displayed, all you need to do is add a Scene Object to the objects panel and use that as an input to the script. The Scene Object is just an empty object, so the script will work with it and nothing will be displayed in your scene when you get to that entry in the list.
Download the completed Script Graph here