Create a reduced framerate effect in Lens Studio using the visual script editor

In this Lens Studio tutorial you will learn how to create a reduced framerate filter to mimic old fashioned film cameras. You can easily add this effect to any lens and we'll use Lens Studio's new visual scripting editor. You can preview this effect by clicking here or by scanning the snapcode below.
Scene setup
Most of our work is going to be done with the visual scripting nodes, but we do need a little bit of scene setup. Start off by creating a new Render Target in the Resources Panel and name it "freeze" or something like that. Then create a new Camera in the Objects Panel, put it on a new layer, and set the camera's render target to the "freeze" render target you just created. Then head to the Scene Config Panel and make sure the "freeze" render target is rendered first. Then select the original camera, change the Clear Color Option to "Texture," and then for the Input select the "freeze" render target. Now if you disable the freeze camera, you will see the image in the preview panel freeze. When a camera is disabled, it outputs the last thing it "saw," so by disabling and enabling the freeze camera we can create our effect.

Visual scripting
We can create our reduced framerate effect using a regular script, but let's go ahead and use the visual scripting feature of Lens Studio. In the Resources Panel, create a new Script Graph and name it something like "frameFreeze." Our approach will be to enable the freeze camera every "x" number of frames and disable it the rest of the time. Let's get started.
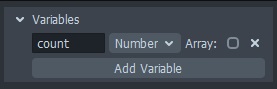
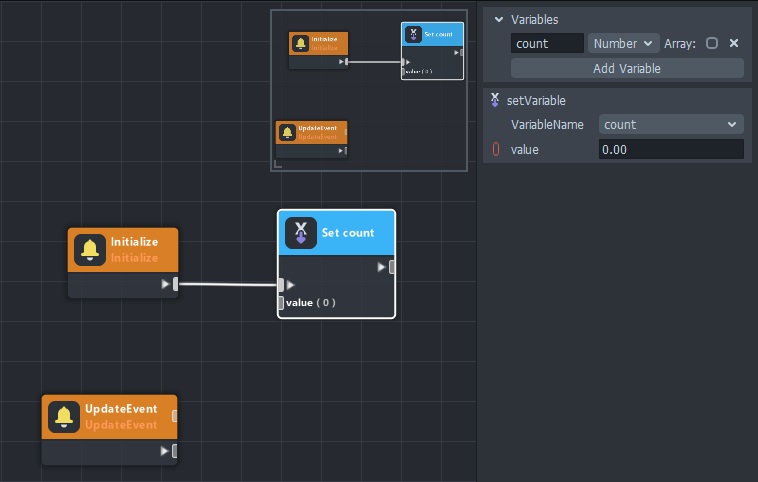
If your Script Graph Editor isn't already open, select the script in the Resources Panel and then click on "Graph Editor" in the Inspector panel. You should see an Initialize node and an UpdateEvent node. We will need both of these, so that's perfect. Let's start by keeping track of which frame we are on. Over on the right hand side of the screen, click on "Add Variable." Name it "count" and change the type to "Number."
We want to start this number out at 0 and then increment it each frame. Right click in the graph editor window, select "Add Node," and then search for the "setVariable" node. Select the newly added node and make sure the VariableName is "count" and the value is 0. Then plug the Initialize node into the setVariable node. That is all we need to do with our scene setup.
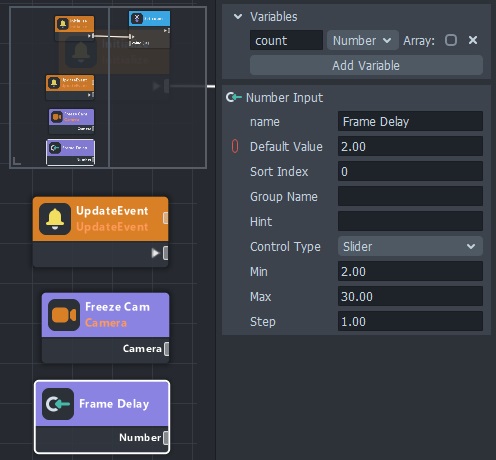
Now let's work on enabling/disabling the camera. Our script needs to know which camera to work with and how many frames to wait before enabling it. Add a "Camera Input" and a "Number Input" node and give each a good name. Feel free to give the Number Input node a default value of 2 or something. On the Number Input node you can also change the Control Type to "Slider" and specify a min and a max value. Set the Step to 1.00.
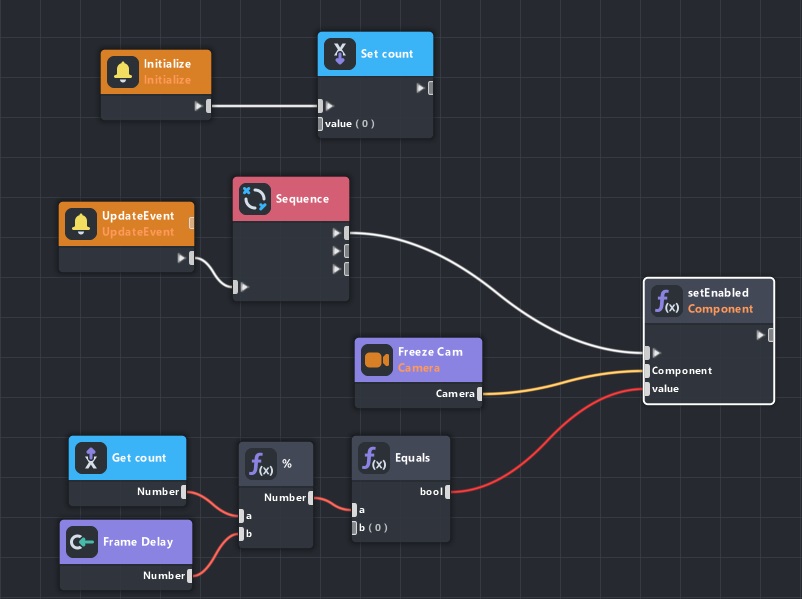
Our UpdateEvent node will trigger every time Snapchat updates the frame. Now, this is a different framerate than our reduced framerate. Our reduced framerate is only going to be an illusion because we are pausing the camera input, but in reality Snapchat will still be running at ~30 fps. So the UpdateEvent node will trigger approximately 30 times each second. What we need to do is check to see if it is time to enable or disable the camera and then increment our "count" variable. Because we have multiple things to do, let's add a "sequence" node to kick off all of our actions. Connect the UpdateEvent node to the Sequence node. Select the Sequence node and change its count to 3. We want to decide whether or not to disable the camera, increment our count variable, and then I'm also going to print out the current value of "count."
So how do we know when to enable the camera and when to disable it? For that we are going to use the modulo operator which uses the % symbol. The modulo operator gives you the remainder of a whole number division operation. Some examples are: 2 % 2 = 0 and 5 % 3 = 2. We can modulo our count by the frame delay and use that to decide. Here is an example of that using a frame delay of 3:
- Count = 0, 0 % 3 = 0 so the camera is enabled
- Count = 1, 1 % 3 = 1 so the camera is disabled
- Count = 2, 2 % 3 = 2 so the camera is disabled
- Count = 3, 3 % 3 = 0 so the camera is enabled and the frame updates again
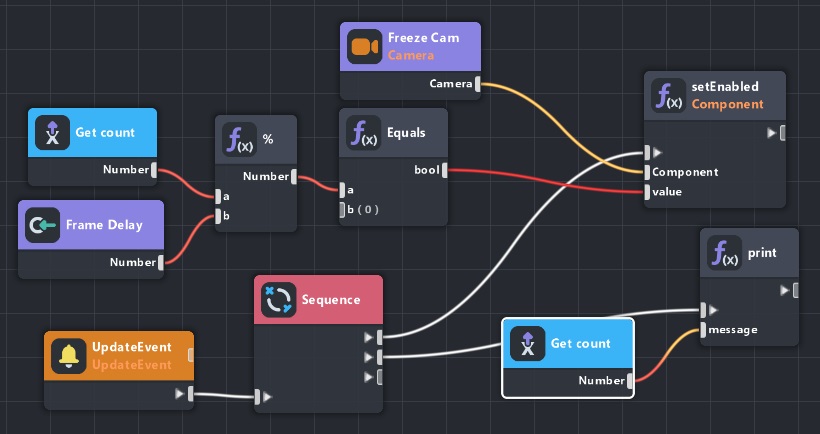
Every time our modulo is equal to 0, we will enable the camera. Otherwise we will disable it. Add a "%" node and a "getVariable" node. We will plug our "count" variable into the top input and the frame delay into the bottom input. Next we need to check if that equals 0, so add an "Equals" node and plug the output of the modulo into the first input of that. The Equals node will output a boolean (true/false) value that we can use to enable/disable the camera. Add a "setEnabled" node from the "Component" section (there are multiple setEnabled nodes, so make sure it is for components). Plug the output of the Equals into the "condition" input, the Camera into the "Component" input, and then connect the top output of the Sequence node into the remaining input of the setEnabled node.
Next I'm going to print the output of the "count" variable so I can make sure it is incrementing correctly. This won't matter for the final lens, but while scripting it can be helpful to print out variables at different times. Add a "print" node, connect the Sequence node to it, and then use the Get count node for the message. You can re-use the existing Get count node or you can create a new one. Also feel free to rearrange your nodes to keep things (somewhat) organized.
Our last step in the script will be to increment our count. We will want to get our count variable, send it to an "Add" node which adds "1" to it, then send that to a "setVariable" node which is triggered by our Sequence node.
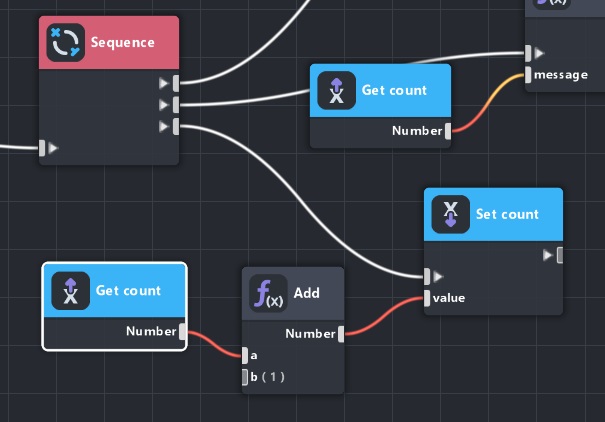
You might have noticed that our setEnabled, print, and setVariable nodes have that little triangle output slot on them. Rather than use the Sequence node, we could have chained everything together in one long line. I just used the Sequence node to keep things organized a little differently.
Add the script to the scene
Select your main camera (not the freeze camera) and add a Script Component in the Inspector Panel. Choose the freezeFrame script and then specify the script inputs. You will see an error in the logger until you select the freeze camera, but then you should start to see the count variable being printed out. If you increase the frame delay input, the preview video will get more stuttery.
Troubleshooting
If your effect is not working, here are a few things to check.
- Make sure you've saved everything and reset the lens
- Make sure all your nodes are connected correctly and have the right values for the input
- Make sure you did not add your script to the freeze cam. Once the freeze cam is disabled, any scripts added to it will also be disabled.
- Make sure you've specified the camera input for the script after you've added it to the scene
If you are still having issues, head over to the Lens Studio forum and ask away! Be sure to include a description of what is actually happening, what you expect should be happening, and then screenshots of your scene setup and your scripting nodes.